Showing posts with label centerpieces. Show all posts

Friday, July 9, 2010

DIY Detail: Hurricane Vases, Candle Holders, & Cake Stands

I've said it before, but I love Dollar Tree. There are endless possibilities for projects with items from there. Some of the things I got the most questions about and compliments on at the wedding were details made entirely from Dollar Tree products.

Last fall I happened to find this project idea on one of my very favorite home decor blogs (follow it if you're not already!) - A Dollar Tree version of a Williams Sonoma hurricane vase:


I already had several of those vases for the floating candle centerpiece idea I had planned, which actually ended up looking like this:

(Pretend all of the floating candles are lit - This must have been later in the night)

I was still looking for a third centerpiece idea to add a little more variety, so I just stopped by Dollar Tree and bought several of their candle sticks and turned a few of my extra vases into hurricane vases. I used E-6000 glue to attach mine, but in the tutorial I linked to she used hot glue. Either would work!

(This was on Friday when we decorated. No pro picture of it during the reception yet - I'll be sure to include one in my recaps!)

I love how they turned out and I'm even happier that they're being used again. My friend J is getting married on the 31st and she's using them to line her aisle with floating candles in them instead of the tall white candles. Afterward I'll use a few in our home and both my mom and MIL want one to keep. SO easy and so cheap! $3 for a big hurricane vase!

Well, I couldn't stop there. There are so many other options with those glass candlesticks! I love candle holders, so I grabbed a few glass ones the last time I was in Dollar Tree and created this:

(I apologize for the crooked picture and messy background)

I wish I would've thought of it sooner - Several of those scattered around our reception would've been so pretty! Thankfully, I did think of my third and final idea prior to the wedding. Somewhat at the last minute we decided to turn our cake table into a semi-dessert bar. We were originally supposed to have mini cheesecakes made by a family member, but that fell through, so instead my dad made his famous snickerdoodles and we had cream cheese mints and some other goodies in addition to our cake. We needed something to put everything on, and I really didn't feel like buying expensive trays or cake stands, so I made my own!


Them in action on the left side of the table

They were the perfect size and we'll be able to pull them out and use them for entertaining guests! I love projects that can be reused after the wedding!

Did you have any projects that you'll get to display in your home or use again after the wedding?

Friday, December 4, 2009

Centerpiece Ideas

I've (finally) decided on my centerpieces, but I realized I had a lot of centerpiece ideas in my inspiration folder, so I thought I'd share them in case any of you are still looking for ideas.

I know paper lanterns are a big trend right now, but here's a new take on them:


They used artificial flowers, but I'm sure there would be some way to do the same thing with real ones.

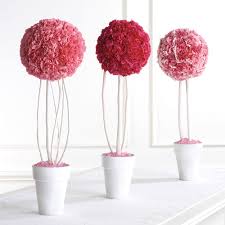
I'm sure many of you have seen pictures similar to these, but it's amazing how much of a statement tightly clustered flowers (carnations, even!) make:


Carnations make gorgeous pomanders! The ones sitting on top of vases look similar to mine (but are so pretty in pink!)

These lace candle centerpieces would be so easy, but are still so pretty:


And you know I love luminaries:


And in case you don't like any of those, here are 50 more you can check out, courtesy of Martha!

I think they're each so pretty, and I'd love to try and include all of them, but I think that might be a bit much. So, I'll do the next best thing and live vicariously through any of you who choose to use them!

Have you found more ideas than you're able to incorporate?

Thursday, November 19, 2009

Every Little Bit Helps

I wasn't kidding when I said I had some extra time this week - I was able to spend most of the evening yesterday working on some small projects I'd wanted to get done for awhile now. They aren't anything major, but I still love being able to cross things off my to-do list!

First, we ordered our STDs! I liked how the one I had printed at Target came out, so I went ahead and ordered all 250 of them from Shutterfly. I signed up for an account which gave me 50 free prints, and I also had a coupon code for free shipping on purchases over $30 (SHIP30 if you're interested!), so the total came out to only $32.66 after tax! I saved $20, and I'm more than happy with the quality and the fact that I should have them in 3-7 business days!

I also worked on the throw garter. I blogged about wanting to have a KU garter for us to keep (and for my something blue), but I didn't necessarily want to spend the same amount on another garter that will likely end up around one of David's buddy's head. I happened to find this Martha Stewart eyelet garter at Big Lots (I swear I'm not being paid to advertise for them - I just find great stuff there!) for $2.00:


source - Funny that they're trying to sell the same thing for $14.99

It was a little plain, so I added a little ribbon-which makes everything better-and a small embellishment, and it now looks like this:


I finally got around to buying some beads to hang down in the vases with the off white pomanders on top. I couldn't get a very good picture of it, but the beads catch the light and make a big difference - The vase doesn't look nearly as empty now:


I think I might also add some clear floral rocks with a LED tealight to the bottom like I did in the centerpieces:


It would add even more interest to the bottom of the vase, and it would make it a lot less top heavy.

I also finally figured out something to add to my tulle pomander centerpieces! I wanted pearls or something that would catch the light, and I found these glass beads on wires in the Christmas section at Hobby Lobby. There were probably close to 50 in the package, and they were 50% off making them like $1.50! It was the perfect solution - It requires barely any extra work, but makes a big difference I think. Again, it was hard to get a good picture of them, but this is the idea:


I still haven't added the ribbon and tag with our monogram, but they're getting closer to the final version!

And last, but definitely not least, I finally got around to making an invitation mock-up! But I'm going to save that for another post. :) I'll just give you a teaser:


While none of these things are huge in and of themselves, it felt so good to make progress! Every little bit helps!

Have you had a chance to get around to the little projects that seem to get pushed to the side? Doesn't it feel good when you make some progress on them?

Wednesday, November 11, 2009

Centerpiece Mock-Up

While I was at home, my mom and I finally found some pink tulle to use for the centerpiece mock-up. (It was amazing how hard it was to find! Hobby Lobby, Wal-Mart, and Hancock Fabrics were all out!) My mom had a couple ideas for the vases without the submerged tulle, so we played around with them a little using some LED tealights. We were able to find a package of 8 of them (with a replacement battery for each one!) at Big Lots for $6. I should write a post about all of the wedding things I've found at Big Lots - I love that place! Here is what we came up with:


I wish I would've been able to get a clear picture without using the flash, but I wanted you to get the idea of what it'll actually look like all lit up!

Here's a clearer picture before we were finished:


I'm not sure if we'll use that damask ribbon or a thicker one around the middle vase


We decided there was too much tulle submerged and you couldn't really tell what it was, so we tried it with about half as much tulle and liked it much better:


It matches better with the tulle bows on the other vases and you can actually see the texture of the tulle in the vase this way - We liked it much more!

There will be a damask table square under the vases, so they'll be grouped closer together, and we'll have 4 votives around the vases as well. I think all of the candle light will look so pretty! I just need to buy the floating candles and the rest of the tealights, and we'll have all of the supplies - David and I bought the river/floral rocks at Michael's on Sunday night because they're $0.89/bag right now! Make sure to get some if you're using them for anything - That's the lowest price I've seen.

What do you think? Doesn't the pink tulle look better than the white I tried it with originally?

Sunday, September 20, 2009

Weekend Wedding Progress

Sorry for my absence! (And thanks Mom, for calling me on it!) Life has been incredibly busy lately, but it does make time go by faster, which is nice - That means the next time I get to see David is getting closer! We've got 2 more weeks to go, but I know we'll both be busy so it'll be here before we know it. This weekend BM M came up to visit and we made some progress on a couple projects. Also, BM S stayed up until 1 AM with me last night working on centerpieces - She's wonderful. I'll update you on the progress we made:

First, we finished the basket of flip flops. There are a few pairs we haven't made tags for yet, because I can't figure out how I want to do them. The XS and XXS pairs will have different tags because with my Cricut, I'm unable to put more than one letter on the tag. I haven't quite decided how I want to do them. But we're close!


The bin is a little full, but I have another matching one that I'm going to use for the programs so we'll be putting the extras in there after the ceremony is over. I love the little tags!

We also worked on the tulle pomander centerpieces. I finally opened the box of styrofoam balls I got and tried to cut one of the 6" balls in half. I ended up slicing my finger open and didn't make hardly any progress on the ball. So we went to Michael's and bought a new tool (with a 40% off coupon of course):


I wasn't sure how it would work, especially when I read the back and it said, "Made for use only with Styrofoam brand foam." The balls I ordered aren't real stryrofoam, so I was a little nervous about trying it. It says it heats up to 410 degrees! It ended up working great, although it's a fairly tedious process. It still saves lots of money compared to buying 18 whole 6" balls! (PS - The tool is supposed to be straight, I kind of bent it by pressing too hard.)


There's BM S helping with the tulle :)


It definitely takes quite a bit of time, but at least we have a while to spread them out over. And I have a wonderful bridal party that's willing to help me! :) BM S and I decided it should be a whole bridal party project so we could get them all done in one night in everyone did one. Sounds good to me!

I decided to see how the 3" balls looked as pomanders as well. When I took them out of the box they looked way too small and I almost just sent them back. But, I added all of the mums that I had left to one and it looks like they're going to be exactly the right size! I knew the mums were big, but I can't believe how much width they add. I love when things work out perfectly!


Don't those look tiny?!


Now I can't wait for Hobby Lobby to get more of the mums in! I want to finish the pomanders. I feel like we got a lot done this weekend, though! BM M found her bridesmaid dress (which I'll blog about soon!) AND we got to watch our Hawks beat Duke on Saturday!


With BM M at the game


BM S and BM M! :)

All in all, I'd say it was a pretty productive weekend! Now I need to get around to studying before tomorrow morning. Do you have to save most of your planning for the weekend?

Thursday, September 10, 2009

Centerpiece Progress

My original vision for centerpieces was a mixture of topiaries on half of the tables and cylinder vases with floating candles on the other half. I thought the topiaries would add height to the room, and I've always liked the look of them. I originally planned to have them look something like this:


However, when my mom and I went looking for relatively inexpensive silk flowers that would work we couldn't find anything that would be reasonably priced (when covering a 6" foam ball) for around 18 centerpieces. I had seen Miss Beagle's post on Weddingbee about tulle pomanders and my mom had seen a similar idea somewhere, so we decided to try it for the centerpieces.

Since it was Sunday, Hobby Lobby was closed, and Michaels only had the overpriced bridal tulle. But, we thought maybe the tulle circles would be easier than plain tulle anyway, so we went ahead and bought a couple packages. (It ends up that it looks the same whether you cut the pieces of tulle yourself or use pre-cut circles, so don't waste your money!) I already had some pearl head pins from the unity candle project so we bought 1 more package thinking the pearls would be pretty with the tulle. (You can't see the pearl heads, so don't waste your money on that either. Hey, you live and you learn, right? We ended up buying sewing pins - 750 of them for $4.) I had already bought the flower pots at Hobby Lobby because they were 50% off, making the 6" flowerpots $1.00. This was by far the cheapest we could find them, so I went ahead and bought all 18 of them.

My mom started by painting all of the pots black. We just used craft paint and a brush. We both figured it would take at least a couple bottles of paint, but my mom ended up finishing them and still had some paint left over! And they only took one coat! I love how they turned out:


While my mom was doing that, I started with the tulle. I made the tulle circle into a cone shape and pinned the 'point' of the cone to the ball and then fluffed out the edges. (So mine has a different look than Miss Beagle's pomanders.) It wasn't hard at all, but we quickly realized it would take more tulle than we thought. I got about 1/3 of the way done with the two packages of tulle circles (which were different sizes).


The next day we went to Hobby Lobby and bought 3 yards of their regular tulle for about $1/yd. I was originally going to cut circles out of it, but after finding out how long that would take, I ended up just cutting pieces and realized it looked exactly the same. When I was about halfway done, it looked like this:


*Another note: Use a white styrofoam ball rather than a green one!*

My mom is brilliant and happened to put the ball on top of the flower pot to see what it looked like that way. Well, I ended up loving it. And I love it even more because it will save me both time and money. By doing it this way I won't have to buy dowel rods, plaster to fill the pots with, or rocks/something to cover up the plaster. I'll also use a lot less tulle since I'll only be covering half of a 6" ball AND I can cut the balls in half which will also save money! I ordered the styrofoam balls from plasteelcorp.com and for 9 6" balls (which I'll cut in half) and 6 3" balls that I'm using for something else (post coming soon!) it was only $36 including shipping. I'm going to either wait for the tulle to go on sale or else use a 50% off coupon at Hobby Lobby next time as well. Ok, enough with the details, let me know what you think:


We'll be adding a pink ribbon around the middle of the pot and a cardstock square with our monogram or names and wedding date. I haven't designed them yet, though. What do you think? My mom thinks we should add some pearls or something, but I'm not sure yet how to do that or what to use exactly. Let me know if you have any suggestions! I'd love to hear them!

Did your centerpieces end up totally different than what you originally imagined?

Wednesday, July 8, 2009

Centerpieces; The Original Plan

We think we pretty much have ideas for centerpieces decided on. Since there will be close to 30 round tables, so I thought 2 alternating centerpieces (of different heights) would be more interesting.

For the first, shorter, centerpiece we're using 3 cyllinder vases. 2 of the vases will be 7.5" tall and will look like this:


The other vase on those tables will be 10.5" and the same cyllinder shape. They're from Wal-Mart and are $1.97 each, but I can't find them on their website.

All 3 vases will have submerged flowers (pink orchids most likely) with a white floating candle on top. They'll be surrounded by votives and it will all - hopefully - be sitting on DIY damask table squares!

All put together it will look something like this:


(Minus the flowers around the base and add the damask table square)

The centerpieces for the opposite tables will be topiaries with votives surrounding them on a damask table square.

We'll be using terracotta pots and probably artificial flowers. They're a couple dollars at Wal-Mart, but I can't find them on their website either. We'll be painting them black, but they'll look similar to these:


I think the difference in height will add a lot to the room! What do you think?

Will you/did you use alternating centerpieces or stick to just one?
Related Posts Plugin for WordPress, Blogger...