Showing posts with label paper products. Show all posts

Tuesday, July 13, 2010

DIY Detail: Advice Cards

I knew as soon as I read Mrs. Star's rehearsal dinner recap last December that I wanted to have advice cards at our rehearsal dinner. It was one of my easiest projects, so it kept getting pushed to the bottom of the list. Finally the Wednesday night before the wedding at 1 AM, my wonderful MOH A and I completed the project. 

Basically the cards each have a life event that David and I will someday face together. Our closest family and friends who were at our rehearsal dinner were able to choose one of the cards and give us their advice for that event. They would seal the envelope and we have to wait until that day comes to open it. 
For the materials I used a pack of note cards from Hobby Lobby (that were 50% off, so $2 for 100 of them) and a pretty stamp (also 50% off, so $4). I had a pink stamp pad already and pink envelopes (also from Hobby Lobby) left over from our attempt at using them for our save the dates


MOH A stamped each card and envelope and I wrote in the event on both of them. Here's the list of events we used:
  • Our wedding day
  • Our first kiss as a married couple
  • Our wedding night/first night of our honeymoon
  • The day we return from our honeymoon
  • Our first night in our new home
  • Living together
  • Our first big fight
  • Our first Christmas as a married couple
  • Our first anniversary
  • The night one of us loses/leaves our job
  • Finding out we're pregnant with our first child
  • The birth of our first child
  • Our first night home with our first child
  • The birth of our second child
  • Our 10th anniversary
  • The death of a pet
  • Becoming empty-nesters
  • Our 25th wedding anniversary
  • Our first child's wedding day
  • Finding out we're going to be grandparents
Photo by BM S
(You can click to enlarge)
We set them all out on a table so people could look through and choose one they wanted. We made an announcement about it describing what it was, and as I talked to people I asked if they had filled one out yet. The majority of them were taken, and of the ones that weren't, my mom took several. :) 
Photo by BM S

It was fun seeing which card people chose, especially our groomsmen. I love these pictures of my brother and David's friend from grade school writing out their advice.

Photo by BM S
(We reused the centerpieces from my bridal shower for the rehearsal dinner!)

Photo by BM S

We've loved reading them so far, and it's so fun having several of them to look forward to! MOH A and her boyfriend chose the 'first kiss as a married couple' one so it would be one of the first ones we'd open, and David said he was thinking about their advice right before our kiss! 

For as quick, easy, and inexpensive as this project was, it was still one of my favorites! It's really meaningful to me to have the advice of our family and friends, many of whom are much wiser and experienced than we are. I'd definitely encourage anyone to do this project - It'll be something you cherish for years to come!

Did you do advice cards? Have you enjoyed them as much as we have?

Thursday, July 8, 2010

DIY Detail: Programs

I had a vision when it came to our programs. I knew I wanted a booklet style tied with ribbon, so it was just a matter of coming up with the template from there. I honestly had nothing to do with that part of it - My wonderful groom spent a whole evening designing our program inserts while I worked on other projects. 

We had our family members who had been offering to help with wedding stuff over about a week and a half before the wedding. We ordered pizza for everyone and then got down to business. We sat around the table and made an assembly line of cutting, folding, rounding corners, punching holes, threading/tying ribbon, and stamping the cover. We seriously could not have done it without all of the help. (At least at that point in wedding planning - if you start a month earlier, it would be do-able but not very fun.) Even with 8 of us, it took us a good 3-4 hours to make 175 of them.


But, even with that being said, I'd do it all again because I absolutely LOVED them. They were exactly what I'd envisioned (except maybe for the cover design, but I was still happy with it) and our guests must have liked them too because we only had about 10 left!

Ok, enough talk. Here they are!


Even before I was engaged I knew I wanted to include little notes to each member of our bridal party. All of them are incredibly important to us and as a guest, I always love reading personal touches like that in the program. David wrote his notes first, and I cried as he read every single one. They were so heartfelt and sweet!


I also knew I wanted to include the full text to "Union," the reading we had my aunt/godmother read. Every single line of it is SO true for us and for our relationship, I didn't want our guests to miss any of it. 


I put them all in a bin I'd bought several months before specifically for our programs (ha, at least I think ahead!) and admired our handiwork. Love. Them.


Were your programs a labor of love?

Tuesday, March 2, 2010

In Case We Forget Where We're Sitting

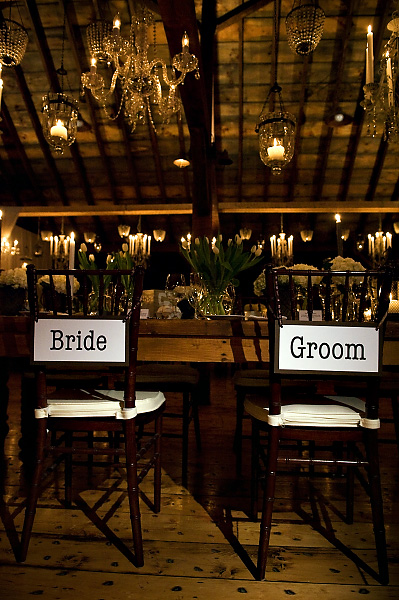
Yes, I realize that chair signs for the bride and groom aren't necessary or even very practical, but they are SO cute. Just look at these!


So, when I saw a 'Brides' pack of chair signs on clearance as I wandered the aisles of Michaels a couple months ago, I grabbed them. At $0.28 I could totally handle that 'expense'. I used their online template to print them and added some damask ribbon - I think they turned out quite well!


Although the chairs at our venue aren't bright red, they're pretty similar in shape to this one. The backs of our chairs will likely be facing a wall, so the signs will probably be on the fronts of our chairs like it is in the picture. 


 For just over a quarter and about 10 minutes of my time, I think they were totally worth it! I love how they turned out, and I'm excited to finally check this project off my list - I've been putting it off for a couple months now!

Are you using chair signs?

Wednesday, November 25, 2009

Invitation Mock-Up

Posting will likely be pretty light over the next few days because I'll be with family (and David!) until Sunday. I figured I should probably go ahead and post about the invitation mock-up I made since I left you all with a teaser almost a week ago! David actually had an opinion on the styles of invitations he preferred when we looked at some samples at one of the bridal fairs we went to, so I tried to incorporate the things he liked.

I started by making a template with just printer paper, so I would know what size I needed to make each of the pieces. My very first "mock-up" (if you can call it that) looked like this:


I used the sizes to design the templates for each of the inserts in Word, and then printed them on cardstock. I made a pocket folder type piece using pretty damask scrapbooking paper:


I apologize for the ugly editing!


I decided after I tried it that I don't like the heart tag, so it will be a square shaped tag with our monogram instead.


I have no idea what I want to do with the back yet, so I played around a little bit with one of the stamps I want to incorporate. I have three stamps I really like, and I'd like to include them somehow (and I think the actual inserts could use more embellishing):


I think I'll back the biggest piece with heavier cardstock, or else use a darker pink invitation jacket, similar in style to these:


What do you think? I know it's a very early version of the final product, but hopefully you can picture what I'm going for. I'm excited to play around with it more. I think that's the main reason I wanted to DIY our invitations - so I could keep adjusting details until we love them!

Are you DIYing/did you DIY your invitations? How many mock-ups or trial runs has it taken/did it take you to get them just right?

Thursday, November 19, 2009

Every Little Bit Helps

I wasn't kidding when I said I had some extra time this week - I was able to spend most of the evening yesterday working on some small projects I'd wanted to get done for awhile now. They aren't anything major, but I still love being able to cross things off my to-do list!

First, we ordered our STDs! I liked how the one I had printed at Target came out, so I went ahead and ordered all 250 of them from Shutterfly. I signed up for an account which gave me 50 free prints, and I also had a coupon code for free shipping on purchases over $30 (SHIP30 if you're interested!), so the total came out to only $32.66 after tax! I saved $20, and I'm more than happy with the quality and the fact that I should have them in 3-7 business days!

I also worked on the throw garter. I blogged about wanting to have a KU garter for us to keep (and for my something blue), but I didn't necessarily want to spend the same amount on another garter that will likely end up around one of David's buddy's head. I happened to find this Martha Stewart eyelet garter at Big Lots (I swear I'm not being paid to advertise for them - I just find great stuff there!) for $2.00:


source - Funny that they're trying to sell the same thing for $14.99

It was a little plain, so I added a little ribbon-which makes everything better-and a small embellishment, and it now looks like this:


I finally got around to buying some beads to hang down in the vases with the off white pomanders on top. I couldn't get a very good picture of it, but the beads catch the light and make a big difference - The vase doesn't look nearly as empty now:


I think I might also add some clear floral rocks with a LED tealight to the bottom like I did in the centerpieces:


It would add even more interest to the bottom of the vase, and it would make it a lot less top heavy.

I also finally figured out something to add to my tulle pomander centerpieces! I wanted pearls or something that would catch the light, and I found these glass beads on wires in the Christmas section at Hobby Lobby. There were probably close to 50 in the package, and they were 50% off making them like $1.50! It was the perfect solution - It requires barely any extra work, but makes a big difference I think. Again, it was hard to get a good picture of them, but this is the idea:


I still haven't added the ribbon and tag with our monogram, but they're getting closer to the final version!

And last, but definitely not least, I finally got around to making an invitation mock-up! But I'm going to save that for another post. :) I'll just give you a teaser:


While none of these things are huge in and of themselves, it felt so good to make progress! Every little bit helps!

Have you had a chance to get around to the little projects that seem to get pushed to the side? Doesn't it feel good when you make some progress on them?

Tuesday, October 6, 2009

Save the Date, Please!

I mentioned in my post with our engagement pictures that we took some pictures for our Save the Dates (STDs - ha! I know, immature..) as well. I finally got to work on the layout a little bit, but now I'm stuck. I can't decide which one I like best.

Option 1:


I don't think I like it in full color because there's really no way to incorporate our wedding colors. Also, the text on the last sign would be edited so that 'Date' is easier to read like in all of the other ones.

Option 2:


I do like this one a lot more, although David said it isn't one of his favorite pictures of himself. I think I like the prettier font more (and how could I not? It's Albemarle Swash!) and I like that it's black, white, and pink.

Option 3:


I don't particularly like the big picture (of me), but David likes it. He was going back in forth between whether he thinks we should be looking at the camera in the main picture or if he liked that picture. He said he likes it because it makes him think we're saying, "Come follow us!" like on our journey or something - He's too cute.

Option 4:


He wanted me to try a mix of black and white and color. I don't dislike it, but I'm not sure what color text I would use. I still don't think I could use pink (to tie in our color scheme) without it looking off.

Option 5:


I think this one and Option 2 are tied for my favorites. The text would be the same shade of pink of the other ones, though. I don't like the coral-y color. Do you think the text is hard to read since it's across our bodies like that?

Ok, I need some advice! Let me know which one(s) is/are your favorite. Or, if you have another idea all together, I'm open to that, too! We're wanting to send these out in about a month, so I'd like to at least figure out the design so we can look into getting them printed soon. Thanks in advance for your help, ladies!
Related Posts Plugin for WordPress, Blogger...